
Nix in the Wild: Nixing Your Codebase
Welcome back to the ‘Nix in the Wild’ series. In this post, we’ll dive into the practical steps of
integrating Nix into your existing codebase. We’ll establish the foundational elements, including
creating a flake.nix file and setting up the directory structure necessary for the Snowfall
library. Additionally, we’ll create our first Nix shell
to help teams standardize their development environments. I’ll also share some lessons learned from my
experience with Nix, discussing why I chose Snowfall, what I appreciate about it, and what I’d like to
see improved. Let’s dive in and start ’nixing’ our codebase.
Setting Up Nix with Flakes
To follow along, ensure you have Nix installed from the previous post. If you haven’t already, you need to enable Flakes by adding the following line to your Nix configuration file:
|
|
This can be done in ~/.config/nix/nix.conf or /etc/nix/nix.conf.
What Are Flakes?
Flakes are a relatively new feature in Nix, currently classified as experimental. Despite this, they’re expected to become a standard part of Nix due to how useful they are. Flakes simplify version management for Nix packages and make it easier to utilize external resources. For a more detailed explanation, check out Jake Hamilton’s YouTube video.
In this series, I’m using the Initech demo repo, a monorepo designed to simulate a full organizational codebase. When working with Flakes, it’s important to note that there’s a one-to-one mapping between a Flake and a Git repository. Nix can only recognize files in a Flake if they are tracked by Git. So, if you encounter errors, check if the relevant files are added to Git. Remember, you don’t need to commit changes immediately—just ensure the files are tracked.
Why Use a Monorepo?
For the Initech demo, I’ve chosen a monorepo setup for its convenience and numerous benefits in managing multiple small projects. Monorepos are particularly advantageous when dealing with platforms or a large number of systems, as they streamline code reuse and eliminate the need for frequent updates to lock files. The choice between a monorepo and a polyrepo depends on specific project needs and personal preference. However, I’ve found that monorepos greatly simplify management, especially in scenarios involving multiple systems and smaller projects.
If a monorepo doesn’t suit your organization but you have several interconnected components, consider creating a Flake that acts as an aggregator for all your organization’s Flakes. This approach allows you to precisely version the interaction of sub-projects and facilitates integration checks in your CI pipeline with minimal commands.
Setting Up flake.nix
Now, let’s start setting up our codebase with Nix. In the root of the Initech
repo, we’ll create a flake.nix file using the
following command. The flake.lock file will be autogenerated later.
|
|
Why Use Snowfall Lib?
While it’s not mandatory to use Snowfall Lib for structuring your Flakes, I’ve found it to be incredibly helpful. Snowfall is an opinionated library designed for Nix Flakes, which can be particularly advantageous when you’re starting out. By providing a recommended folder structure, it minimizes the complexity of setting up your project and reduces the number of decisions you need to make. Snowfall handles the “glue code” required for importing modules into your Flake and overall just makes it easier to manage your setup. I’ve successfully used Snowfall to manage a range of systems in my homelab and various work projects.
Here’s an example of a basic flake.nix with no configuration that you get from the above command:
|
|
Configuring Inputs
Next, we’ll add the Snowfall Lib repository to the inputs
section. Additionally, it’s a good idea to specify the current stable branch of nixpkgs and an unstable
branch for flexibility in choosing packages. You can manage this selection using overlays, which we will
cover later. Here’s an example of what your inputs might look like:
|
|
Defining Outputs
Earlier in this post, we introduced a basic example of defining outputs in a Nix Flake:
|
|
In this example, the outputs attribute is defined as a function that takes two arguments: self and
nixpkgs. The function then returns a set of packages, specifically two Linux packages: hello and
default. This simple function demonstrates how outputs can be constructed based on the inputs provided
to the function.
Now, we’ll transition from this basic setup to a more sophisticated one using the mkFlake function
from the Snowfall Lib. This library provides a standardized way to define outputs, making it easier
to manage complex configurations. Instead of manually specifying the outputs, we leverage mkFlake
to automate and streamline the process.
Here’s how we use Snowfall Lib to define our outputs:
|
|
In this setup, the outputs function uses the inputs to call mkFlake, a utility function provided by
Snowfall Lib. The mkFlake function simplifies configuration by managing common tasks and structures,
allowing you to focus on higher-level configurations. It generates outputs based on the provided
inputs, such as Nix packages and any additional input Flakes. Because mkFlake is opinionated about
the folder structure, it can automatically stitch everything together. This results in outputs that
export all packages, define multiple computer systems, and set up user profiles—all without the need
for custom plumbing. This approach not only reduces boilerplate but also ensures consistency across
different projects. By adopting Snowfall Lib, you can streamline your development process, particularly
in environments with multiple systems and components.
Organizing the Project with Snowfall
In this section, I’ll give a quick rundown of the various directories. I’ve noticed that when introducing Nix to an existing codebase, people often wonder why these new directories suddenly appear and what they’re for, especially if they’re only vaguely familiar with the reasons for adopting Nix in the first place. Understanding the role of each directory will help make the structure and purpose of the setup clearer. For more details, the Snowfall documentation is excellent and can be found here.
Snowfall Directory Structure
This structure for me has generally gone at the root of the git project but it is possible to move it elsewhere in the project. The Snowfall docs have ./nix as being their example location. Below is a high level overveiw of what the structure of our projects will look like once we add Snowfall and Nix.
Root Directory
- flake.nix: Your Nix Flake definition.
- flake.lock: The lock file that tells Nix what versions of
nixpkgsand other Flakes to use.
Library Functions
-
lib/ (optional): This directory is designated for custom library functions. It can contain helper functions to standardize common tasks or reduce boilerplate code. With Nix being a programming language, the possibilities are extensive.
default.nix: If you choose to add additional library functions, they would go here. This file defines an attribute set that merges with the existing lib.
Package Definitions
-
packages/ (optional): This directory is where we define the packages that our Flake can export. These packages don’t have to be large or complex; they can be as simple as a script that performs a specific task and needs to be easily accessible to others. Alternatively, you can use this space to repackage existing software that isn’t already available in the Nix ecosystem. We’ll cover more on this topic in later blog posts.
<package-name>/default.nix: This file contains a function that returns a derivation for the package.
To run the packages defined here, you can use the following command:
1nix run <local or remote path to flake>#<package-name>
NixOS and Home Manager Modules
- modules/ (optional): This directory is used for managing one or more computer systems with
NixOS or configuring user environments, such as dotfiles. It provides a central location for your
Nix modules. When I mention dotfiles, you
might think of configuration files for various software, and you’re not far off. However, with Snowfall,
we can create reusable modules that can be imported into other configurations. For example, you could
define how an Apache Kafka server should be configured when deployed to a system or specify which
plugins should
automatically be available in Firefox when setting up a home environment. We’ll dive deeper into this
with later Posts.
<platform>/<module-name>/default.nix: Platform-specific modules, such as fornixosordarwin.
Overlays
-
overlays/ (optional): Overlays are a powerful feature in Nix that allow you to customize or extend the
pkgsnamespace from your chosennixpkgsversion. For instance, you can use an overlay to select the latest version of Firefox from the unstable branch or to replace the default Neovim with your customized version whenever Neovim is added. Think of overlays as a way to “overlay” additional packages or configurations onto the existing package set. You can use them to override existing packages or introduce new ones.<overlay-name>/default.nix: This file contains a function to modify the set of packages (pkgs).
For example, here’s what
nix-tutor/default.nixmight look like, providingpkgs.nix_tutoras an installable package elsewhere in the Flake:1 2 3 4 5{ channels, nix-tutor, nixpkgs, ... }: final: prev: { nix_tutor = nix-tutor.packages.${prev.system}.menu; }
System Configurations
-
systems/ (optional): This directory is for configurations of your NixOS systems, virtual machines, or AMIs for cloud platforms like Azure or AWS. The system configurations here generally don’t contain extensive logic; instead, they primarily enable modules defined in the
modules/directory. This setup allows for highly standardized systems or VMs that can be reconfigured and updated dynamically, ensuring consistency across deployments.For instance, in my personal dotfiles repo, I’ve set up GitLab CI/CD to automatically build all my systems upon commit and deploy them upon merge. This approach transforms system management, as any system can build another and then deploy the resulting configuration, opening up numerous possibilities!
-
<architecture>-<format>/<system-name>/default.nix: Configuration files for specific systems (e.g.,x86_64-linux,aarch64-darwin).Here’s an example configuration, where
initechincludes modules defined in themodulesdirectory:1 2 3 4 5 6 7 8 9 10 11 12 13 14 15 16 17 18 19 20 21 22 23 24 25 26 27 28 29 30 31 32 33 34 35 36 37 38 39 40 41{ pkgs, config, lib, ... }: with lib; in { imports = [ ./hardware.nix ]; initech = { archetypes.developer = enabled; system = { boot = enabled; passwds = enabled; }; user = { name = "gumby"; fullName = "Matt Camp"; email = "[email protected]"; extraGroups = [ "wheel" ]; }; services = { openssh = { enable = true; authorizedKeys = [ "ssh-ed25519 AAAAC3NzaC1lZDI1NTE5AAAAIGw+o+9F4kz+dYyI2I4WudgKjyFOK+L0QW4LhxkG4sMt [email protected]" "ssh-ed25519 AAAAC3NzaC1lZDI1NTE5AAAAIKdMWMFyi7Lvjm78KOX3tKZ5bkEZ7bHA56ZKKtTb9wIo [email protected]" ]; }; ntp = enabled; }; }; system.stateVersion = "23.05"; }In this configuration, various modules and services are specified, such as SSH keys and NTP services, ensuring a consistent setup across the system.
User Home Configurations
-
homes/ (optional): This directory is used for home environment configurations, which are similar to system configurations but tailored for individual users rather than entire systems. These configurations can be applied across various operating systems, not just NixOS. For example, you might want to provide standardized yet customizable user environments for everyone in your organization. Each user could have a configuration in this directory, allowing them to enable specific modules with customized options.
-
<architecture>-<format>/<home-name>/default.nix: Configuration file for individual user home environments.
Here’s an example user configuration file:
|
|
A user could activate this configuration with the following command:
|
|
This setup allows for defining a variety of user-specific settings and applications, which can be easily deployed and managed across different systems.
Development Shells
-
shells/ (optional): This directory is where you can define various Nix shells. Think of these shells as being similar to Docker containers but with less isolation. When you activate a Nix shell, it makes all the specified programs and environment variables available, allowing users to easily set up a consistent environment across different systems. This is particularly useful for organizations adopting Nix, as it simplifies the onboarding process by providing a pre-configured development environment. No more spending days or weeks setting up; a well-defined shell can get new team members up and running quickly.
However, be cautious about the temptation to include everything your team uses in a single shell. While possible, this can lead to long initial load times and a less efficient setup. A better strategy is to create shells tailored to specific tasks—one for building projects, another for testing, etc. This way, you load only what you need, when you need it, but you still have the option to include everything if that’s what you prefer.
<shell-name>/default.nix: This file contains a function that defines the Nix shell.
Here’s an example of a simple shell:
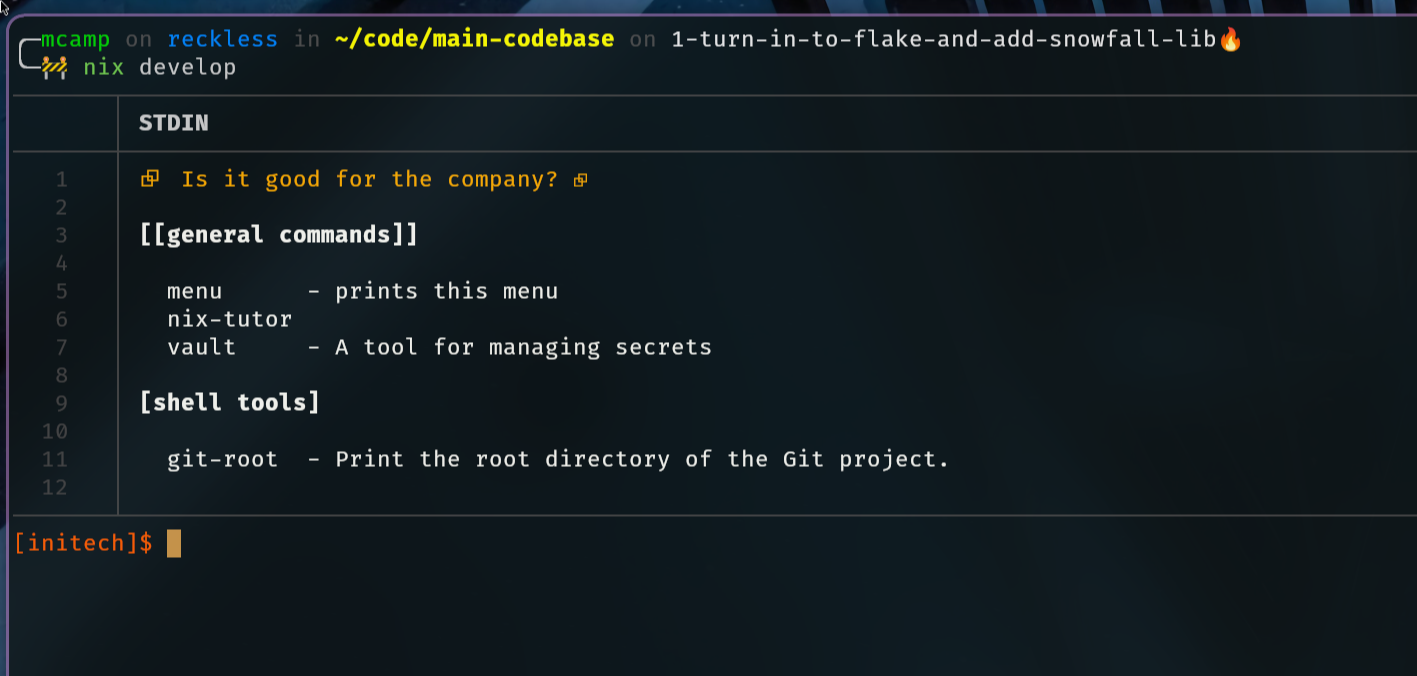
1 2 3 4 5 6 7 8 9 10 11 12 13 14 15 16 17 18{ mkShell, pkgs, ... }: mkShell { buildInputs = with pkgs; [ neovim k3d podman kubernetes k9s ]; shellHook = '' echo -e "\e[32m+-----------------------------------------------------------+\e[0m" echo -e "\e[32m|⮺ Initech: Is it good for the company? |\e[0m" echo -e "\e[32m+-----------------------------------------------------------+\e[0m" # Additional setup can go here ''; }
To activate the shell defined here, you can use the following command:
|
|
This setup ensures a reproducible and efficient development environment tailored to your team’s needs.
Templates
-
templates/ (optional): This directory is used for storing directories of templated files that you want to reuse. These templates are basic and don’t support automatic modification but can be a helpful starting point for writing new modules or Flakes.
<template-name>/: Files and folders placed here will be created wherever the template is deployed.
To deploy a template, use the following command in the directory where you want the templated files to be generated:
|
|
This command will create the template’s files and folders at the specified location, making it easy to set up new projects with a predefined structure.
Creating a Default Shell Environment
Earlier, I provided a snippet of a basic Nix development shell, which is perfectly sufficient for many needs. However, I’ve had great success using a specialized development shell by Numtide. This shell uses TOML files to define the entire environment, which is especially appealing to those who are still hesitant about adopting Nix. The TOML configuration is straightforward, and you can easily extend it with pure Nix code for more advanced functionality. In this section, I’ll show you how to set up a simple default Nix development shell using the Numtide dev shell.
Update the flake.nix
Add the Numtide Devshell Flake to the inputs
|
|
Add the Numtide Devshell to the mkFlake Function’s overlays Argument
Using the overlays argument in mkFlake is a bit different from adding overlays to the
/overlays directory. This approach is good for quickly adding predefined functionality, like
devshell.overlays.default, which brings in default features from the devshell Flake with minimal
fuss. On the other hand, using the /overlays directory is more about allowing you to tweak how packages
from nixpkgs are modified or added.
|
|
Make a Devshell
Now that you’ve added the overlay, the next step is to create the devshell. In the /shells folder,
create a new folder named default and place a default.nix file inside it.
|
|
Next, add a devshell.toml file to the same directory. Note: You can name the file anything you
like; just remember to update default.nix with the correct path and filename. The simple toml file
below demonstrates adding Hashicorp’s Vault to an environment and a custom shell alias called git-root,
which returns the path to the root of a Git project.
|
|
This setup not only adds the Vault package to your environment but also defines a custom command to easily find the root of your Git project, showcasing the flexibility and power of using a devshell with Nix.
One last step: you may have noticed I added a command nix-tutor in the default.nix, which comes
from a package of the same name. This is a small project I started to provide simple Nix lessons, mainly
included here for illustrative purposes. You won’t find nix-tutor on Nixpkgs,
as it’s not included there. To use it, you’ll need to create an overlay.
Go ahead and create a folder in the /overlays directory and name it nix-tutor (feel free to use any
name that makes sense to you). Inside that folder, create a default.nix file and add the following overlay:
|
|
Also, ensure nix-tutor is included in your Flake’s inputs:
|
|
And because we are using Vault, which has a “non-free” license, we need to enable it in the mkFlake
function like this:
|
|
If you tried running this and encountered an error, you might have forgotten to add the necessary files to Git. Make sure to run:
|
|
Once you’ve done that, you can activate the shell by simply running:
|
|
One more thing that might not be clear is that you don’t have to clone this repository down in order to activate the devshell.
|
|
Conclusion
In this post, we’ve taken significant steps toward integrating Nix into our codebase, transforming our initial Git project into a Nix Flake with the assistance of Snowfall Lib. We set up a Nix devshell configured with a straightforward TOML file—an approach our team is already comfortable with—and demonstrated how to add overlays to incorporate packages from other Flakes. These initial steps lay a solid foundation for creating reproducible and consistent development environments, significantly streamlining our workflows. In upcoming posts, we’ll explore how we can leverage Nix to fully manage the development, testing, packaging, and deployment processes for the Initech repo. With these tools, we’re well on our way to a more efficient and reliable development pipeline. The changes made to the Initech repo can be seen in this MR. Stay tuned for more insights and practical applications as we continue this journey! Feel free to comment if you have questions or if anything needs more explanation.
